2017-06-22

2017-02-13
delphi FireDAC 連線 MYSQL libmysql.dll libmysqld.dll copy
COPY
D:\wamp\bin\mysql\mysql5.5.24\lib\libmysql.dll
D:\wamp\bin\mysql\mysql5.5.24\lib\libmysqld.dll
TO
C:\Program Files (x86)\Embarcadero\Studio\18.0\bin
存取範例
procedure TForm1.Button1Click(Sender: TObject);
var
filevar : TextFile;
b,r : string;
i, x: Integer;
a: TStringList;
begin
Memo1.Clear;
Memo1.Lines.LoadFromFile('../../use.txt', TEncoding.UTF8);
//if not UseTable.Active then UseTable.Active := true;
Memo2.Clear;
for i := 0 to Memo1.lines.count-1 do //
begin
b := Memo1.Lines[i];
a := TStringList.Create;
a.StrictDelimiter := true; // Delphi7 沒有這個屬性 :~(
a.Delimiter := Chr(9); // 指定TAB為分割字元
a.DelimitedText := b; // 要被分割的字串
//UseTable.SQL.Clear;
UseTable.SQL.Text := 'SELECT NO FROM temple.`use` where NO = '+a[0];
UseTable.Open;
if UseTable.FieldValues['NO']=null then
begin
UseTable.ExecSQL('insert into temple.`use`(NO,NAME,ADD1,TEL,MEM,POSYN,RG) values(:v0,:v1,:v4,:v7,:v17,:v18,:v23)', [a[0],a[1],a[4],a[7],a[17],a[18],a[23]]);
Memo2.Lines.Add('Insert:'+a[0]+','+a[1]+','+a[4]+','+a[7]+','+a[17]+','+a[18]+','+a[23]);
end else begin
//UseTable.SQL.Clear;
UseTable.ExecSQL('update temple.`use` set NAME=:v1,ADD1=:v4,TEL=:v7,MEM=:v17,POSYN=:v18,RG=:v23 where NO=:v0', [a[1],a[4],a[7],a[17],a[18],a[23],a[0]]);
Memo2.Lines.Add('Update:'+a[0]+','+a[1]+','+a[4]+','+a[7]+','+a[17]+','+a[18]+','+a[23]);
end;
// for x:=0 to (a.Count-1) do
// begin
// Memo2.Lines.Add(x.ToString+'='+a[x]);
// end;
end;
end;
2017-05-28 執行檔 要移動到別台 需要 COPY 以下 這2個 設定檔 放到 同目錄
以下是 MySQL 連線設定檔案範例 在 FDConnectionDefs.ini 最下面
C:\Users\Public\Documents\Embarcadero\Studio\FireDAC\FDConnectionDefs.ini
[mysql]
Database=temple
User_Name=root
Password=xxxxxxxx
Server=127.0.0.1
CharacterSet=utf8
DriverID=MySQL
C:\Users\Public\Documents\Embarcadero\Studio\FireDAC\FDDrivers.ini
D:\wamp\bin\mysql\mysql5.5.24\lib\libmysql.dll
D:\wamp\bin\mysql\mysql5.5.24\lib\libmysqld.dll
TO
C:\Program Files (x86)\Embarcadero\Studio\18.0\bin
存取範例
procedure TForm1.Button1Click(Sender: TObject);
var
filevar : TextFile;
b,r : string;
i, x: Integer;
a: TStringList;
begin
Memo1.Clear;
Memo1.Lines.LoadFromFile('../../use.txt', TEncoding.UTF8);
//if not UseTable.Active then UseTable.Active := true;
Memo2.Clear;
for i := 0 to Memo1.lines.count-1 do //
begin
b := Memo1.Lines[i];
a := TStringList.Create;
a.StrictDelimiter := true; // Delphi7 沒有這個屬性 :~(
a.Delimiter := Chr(9); // 指定TAB為分割字元
a.DelimitedText := b; // 要被分割的字串
//UseTable.SQL.Clear;
UseTable.SQL.Text := 'SELECT NO FROM temple.`use` where NO = '+a[0];
UseTable.Open;
if UseTable.FieldValues['NO']=null then
begin
UseTable.ExecSQL('insert into temple.`use`(NO,NAME,ADD1,TEL,MEM,POSYN,RG) values(:v0,:v1,:v4,:v7,:v17,:v18,:v23)', [a[0],a[1],a[4],a[7],a[17],a[18],a[23]]);
Memo2.Lines.Add('Insert:'+a[0]+','+a[1]+','+a[4]+','+a[7]+','+a[17]+','+a[18]+','+a[23]);
end else begin
//UseTable.SQL.Clear;
UseTable.ExecSQL('update temple.`use` set NAME=:v1,ADD1=:v4,TEL=:v7,MEM=:v17,POSYN=:v18,RG=:v23 where NO=:v0', [a[1],a[4],a[7],a[17],a[18],a[23],a[0]]);
Memo2.Lines.Add('Update:'+a[0]+','+a[1]+','+a[4]+','+a[7]+','+a[17]+','+a[18]+','+a[23]);
end;
// for x:=0 to (a.Count-1) do
// begin
// Memo2.Lines.Add(x.ToString+'='+a[x]);
// end;
end;
end;
2017-05-28 執行檔 要移動到別台 需要 COPY 以下 這2個 設定檔 放到 同目錄
以下是 MySQL 連線設定檔案範例 在 FDConnectionDefs.ini 最下面
C:\Users\Public\Documents\Embarcadero\Studio\FireDAC\FDConnectionDefs.ini
[mysql]
Database=temple
User_Name=root
Password=xxxxxxxx
Server=127.0.0.1
CharacterSet=utf8
DriverID=MySQL
C:\Users\Public\Documents\Embarcadero\Studio\FireDAC\FDDrivers.ini
2016-02-02
swift 創建一個空字典
創建一個空字典
我們可以像陣列一樣使用建構語法創建一個空字典:
var namesOfIntegers = Dictionary<Int, String>()
// namesOfIntegers 是一個空的 Dictionary
這個範例創建了一個
Int, String型別的空字典來儲存英語對整數的命名。它的鍵是Int型,值是String型。namesOfIntegers[16] = "sixteen"2015-11-26
IOS APP 設定中文名稱
在 SupportingFiles 按滑鼠右鍵 選擇 New File...


2015-10-20
2015-10-01
IOS Apple Push Notification 更新 憑證 步驟
先 產生 Certificate Signing Request (CSR)


下圖 一般名稱 我有改為 myPush2015 因為每年都要做一次 很麻煩
到 APPLE 開發網站 選擇APP 然後按下圖 Edit

舊的憑證2015-10/13快到期了 所以要重新申請一個憑證 下圖

按 Continue


按 Generate

按 Download

下載後 在 MAC 電腦 點滑鼠左鍵2下 執行
進入 keychain 匯出 Push Services key 為 .p12 的檔案

輸入 ios_push_cert_prod 按儲存後 輸入密碼
接下來 開啟終端機 輸入以下指令
cd ~/desktop
production指令範例:
openssl pkcs12 -clcerts -nokeys -out cert_production.pem -in ios_push_cert_prod.p12
openssl pkcs12 -nocerts -out key_production.pem -in ios_push_cert_prod.p12
openssl rsa -in key_production.pem -out key.unencrypted_production.pem
cat cert_production.pem key.unencrypted_production.pem > ck_production.pem
測試憑證:
telnet gateway.push.apple.com 2195
openssl s_client -connect gateway.push.apple.com:2195 -cert ck_production.pem -key ck_production.pem
看到下圖 代表憑證OK
將這個 ck_production.pem 這個檔案COPY到 推播主機 就可以使用推播了
另外 APP 記得要設定
開啟App專案,點選Capabilities,打開Background Modes並勾選Remote notifications,如下圖所示

2015-08-30
Android Studio 念佛、拜佛記數器、佛曲播放 開發筆記
2015-08-30 寫這一隻APP都是從網路收集資料學習而來,為了方便以後查閱,記錄一下 原始碼。
Google Play APP 網址:https://play.google.com/store/apps/details?id=com.yichung.lee.count4&hl=zh-TW


Google Play APP 網址:https://play.google.com/store/apps/details?id=com.yichung.lee.count4&hl=zh-TW

xml 檔案連結: activity_main.xml
JAVA 程式碼: MainActivity.java

xml 檔案連結: activity_main_activity2.xml
JAVA 程式碼: MainActivity2.java

xml 檔案連結:activity_main_activity3.xml
JAVA 程式碼:MainActivity3.java
xml 檔案連結:activity_main_activity4.xml
JAVA 程式碼:MainActivity4.java

xml 檔案連結:activity_main_activity5.xml
JAVA 程式碼:MainActivity5.java
strings.xml : strings.xml
2015-07-07
好久沒有寫DELPHI最近有一需求 記錄一下
用DELPHI開發一支程式自動檢查檔案是否建立超過天數自動刪除功能,
需求如下說明
1. 可以定義檢查路徑,路徑需可設多個
2. 可以設定副檔名,如:jpg、png等,大小寫不分
3. 可以設定天數,例如:90、100天
4. 可以往下尋找次目錄的所有檔案,目錄可能會有很多層
5. 判斷該檔案建立的時間距離目前時間的天數


需求如下說明
1. 可以定義檢查路徑,路徑需可設多個
2. 可以設定副檔名,如:jpg、png等,大小寫不分
3. 可以設定天數,例如:90、100天
4. 可以往下尋找次目錄的所有檔案,目錄可能會有很多層
5. 判斷該檔案建立的時間距離目前時間的天數
此版會刪除含以下子目錄 過期之檔案 設定時
請特別注意
下圖未勾刪除

下圖 勾刪除 按儲存後 正式刪除

unit Unit1;
interface
uses
Winapi.Windows, Winapi.Messages, System.SysUtils, System.Variants, System.Classes, Vcl.Graphics,
Vcl.Controls, Vcl.Forms, Vcl.Dialogs, Vcl.StdCtrls, IOUtils, Types, inifiles;
type
TchkFileForm = class(TForm)
Memo1: TMemo;
Button1: TButton;
Days: TEdit;
Label1: TLabel;
Label2: TLabel;
TLabel3: TLabel;
Label3: TLabel;
FileExt: TEdit;
Label4: TLabel;
Memo2: TMemo;
Label5: TLabel;
CheckBox1: TCheckBox;
procedure Button1Click(Sender: TObject);
procedure FormShow(Sender: TObject);
procedure FormClose(Sender: TObject; var Action: TCloseAction);
private
{ Private declarations }
public
{ Public declarations }
procedure run();
function dayDec(s,e : String):Integer;
function chkExt(ext: String):Boolean;
procedure getDirs(Path: String);
procedure getFiles(Path: String);
end;
var
chkFileForm: TchkFileForm;
myinifile:TInifile;
implementation
{$R *.dfm}
procedure TchkFileForm.Button1Click(Sender: TObject);
var
s1 : TStringList;
myFile : TextFile;
begin
// days
myinifile.writeinteger('setini','Days', strtoint(Days.Text));
// FileExt
myinifile.writestring('setini', 'FileExt', FileExt.Text);
// 正式刪除
myinifile.writebool('setini', 'isDel', CheckBox1.Checked);
//
// 路徑資料
s1:=TStringList.Create;
s1.Text:=Memo1.Text;
s1.SaveToFile('chkFilePath.txt');
s1.Free;
ShowMessage('儲存完成!');
run();
end;
procedure TchkFileForm.FormClose(Sender: TObject; var Action: TCloseAction);
begin
myinifile.Destroy;
end;
procedure TchkFileForm.FormShow(Sender: TObject);
var
myFile : TextFile;
text : string;
filename:string;
begin
filename := ExtractFilePath(paramstr(0))+'chkFile.ini';
myinifile := TInifile.Create(filename);
// days
Days.Text := inttostr(myinifile.readinteger('setini', 'Days', 90));
// FileExt
FileExt.Text := myinifile.ReadString('setini', 'FileExt', 'jpg,png');
// 正式刪除
CheckBox1.Checked := myinifile.readbool('setini', 'isDel', False);
// 路徑資料
if FileExists('chkFilePath.txt') then
begin
Memo1.Lines.LoadFromFile('chkFilePath.txt');
end;
run();
end;
// 執行設定目錄
procedure TchkFileForm.run();
var
i : Integer;
Path : String;
begin
Memo2.Clear;
for i := 0 to memo1.lines.count-1 do
begin
Path := Memo1.Lines[i];
getDirs(Path)
end;
Memo2.Lines.Add('執行完成!');
end;
// 取出子目錄
procedure TchkFileForm.getDirs(Path: String);
var
dfs: TStringDynArray;
pathstr: String;
begin
if directoryexists(Path) then
begin
Memo2.Lines.Add(Path);
getFiles(Path); // 取出目錄內檔案
dfs := TDirectory.GetFileSystemEntries(Path);
for pathstr in dfs do getDirs(pathstr);
end;
end;
// 取出目錄內檔案 檢查是否預期 刪除
procedure TchkFileForm.getFiles(Path: String);
var
files : TStringDynArray;
dir : TDirectory;
fname, ext : String;
toDay,fiDay : string;
dd,sday : Integer;
begin
toDay := FormatDateTime('yyyy/mm/dd', NOW);
sday := StrToInt(Days.Text);
files := dir.GetFiles(Path);
for fname in files do
begin
ext := ExtractFileExt(fname);
if chkExt(ext) then
begin
fiDay := FormatDateTime('yyyy/mm/dd', FileDateToDateTime(FileAge(fname)));
dd := dayDec(fiDay, toDay);
if dd >= sday then
begin
Memo2.Lines.Add(fname);
if CheckBox1.Checked then
begin
Memo2.Lines.Add(ext + '=>' +fiDay + '=>' + IntToStr(dd) + ' 已刪除!');
DeleteFile(fname);
end else
begin
Memo2.Lines.Add(ext + '=>' +fiDay + '=>' + IntToStr(dd) + ' 可刪除!');
end;
end;
end;
end;
end;
// 計算日期差
function TchkFileForm.dayDec(s,e : String):Integer;
var
d1:TDate;
d2:TDate;
begin
d1:=StrToDate(s);
d2:=StrToDate(e);
Result := trunc(Double(d2)-Double(d1));
end;
// 確認副檔名
function TchkFileForm.chkExt(ext: String):Boolean;
var
a: TStringList;
x: integer;
s: String;
begin
ext := UpperCase(ext);
a := TStringList.Create;
a.StrictDelimiter := true; // Delphi7 沒有這個屬性 :~(
a.Delimiter := ','; // 指定逗點為分割字元
a.DelimitedText := FileExt.Text; // 要被分割的字串
for x:=0 to (a.Count-1) do
begin
s := '.'+UpperCase(a[x]);
if ext = s then Result := true;
end;
end;
end.
2015-07-02
centOS 檢查 httpd 服務是否活著 若是沒啟動 自動重起

#!/bin/bash
if [ -z "`/etc/rc.d/init.d/./httpd status|grep 'is running'`" ]
then
/etc/rc.d/init.d/./httpd start
echo "`date +"%b %e %T"` httpd service is done" >> /var/log/service_test.log
fi
2015-03-04
VirtualBOX 裝 MAC OSX 10.10.2 版本
檔案下載連結: http://yunpan.cn/cJ9q5H2U87CCi 提取密碼: 85c1
1. 先安裝 VirtualBox-4.3.24-98716-Win.exe
2. 執行 Oracle_VM_VirtualBox_Extension_Pack-4.3.24-98716.vbox-extpack
3. 建立虛擬主機 名稱:MacOSX 作業系統選:Mac OS X 10.9 Mavericks (64 bit)


 然後 輸入 smb://192.168.xx.xx 按連線即可
1. 先安裝 VirtualBox-4.3.24-98716-Win.exe
2. 執行 Oracle_VM_VirtualBox_Extension_Pack-4.3.24-98716.vbox-extpack
3. 建立虛擬主機 名稱:MacOSX 作業系統選:Mac OS X 10.9 Mavericks (64 bit)
4. 主機建立好後 要 在WIN系統 DOS 視窗執行以下命令
MacOSX 是虛擬主機的名稱
vboxmanage.exe modifyvm "MacOSX" --cpuidset 1 000306a9 00100800 3d9ae3bf bfebfbff
以下這行是指定螢幕解析度為 1600x900
VBoxManage setextradata "MacOSX" "VBoxInternal2/EfiGopMode" 4
以下這行是指定螢幕解析度為 1920x1080
VBoxManage setextradata "MacOSX" "VBoxInternal2/EfiGopMode" 5
VBoxManage modifyvm "MacOSX" --cpuidset 00000001 000306a9 04100800 7fbae3ff bfebfbff
VBoxManage setextradata "MacOSX" "VBoxInternal/Devices/efi/0/Config/DmiSystemProduct" "MacBookPro11,3"
VBoxManage setextradata "MacOSX" "VBoxInternal/Devices/efi/0/Config/DmiSystemVersion" "1.0"
VBoxManage setextradata "MacOSX" "VBoxInternal/Devices/efi/0/Config/DmiBoardProduct" "Iloveapple"
VBoxManage setextradata "MacOSX" "VBoxInternal/Devices/smc/0/Config/DeviceKey" "ourhardworkbythesewordsguardedpleasedontsteal(c)AppleComputerInc"
VBoxManage setextradata "MacOSX" "VBoxInternal/Devices/smc/0/Config/GetKeyFromRealSMC" 1
5. 執行完成可以啟動主機了
6. 先格式化硬碟
7. 格式化完成 退出工具,然後同意授權後 就可以點選硬碟 安裝了
8. 安裝完成 要到 VirtualBOX 設定 移除 ISO檔案
9. 重新啟動 就完成了
max os 連接網路芳鄰
在MAC OS按 Command + K2015-02-09
2015 拜佛、念佛記數器 IOS APP 上架 流程 步驟 說明
所先當然先將APP寫好 然後 測試完成沒有BUG
上架步驟1:到 Apple Developer 註冊一個新的APP ID

步驟2: Certificates 的 Production 要增加一個簽證
 步驟3: 增加 Profiles Distributions
 簽證大概就是這三個要做,其實我也不是很清楚真確的步驟 每次上架APP都弄好久,想說把圖抓出來大家會比較清楚。
步驟四: XCODE APP ICON 要先設定好
 把這些圖都設定好

步驟五:APP設定 Profile

步驟六:在 iTunes Connect 我的App 增加APP
 增加APP要特別注意下圖 2015-10-07 原來SKU可以自己命名 不要重複即可


步驟七:增加完成 開始填入 APP 相關資訊

 完成後先按儲存
步驟八:上傳APP程式

 下圖是 檢查成功了
 下圖 點選 Submit 正式上傳APP
 上傳成功 如下圖
 步驟九:回到 iTuns Connect APP 編輯
 步驟十: 價格設定

價格及日期 設定好 就可以 提交 送審了
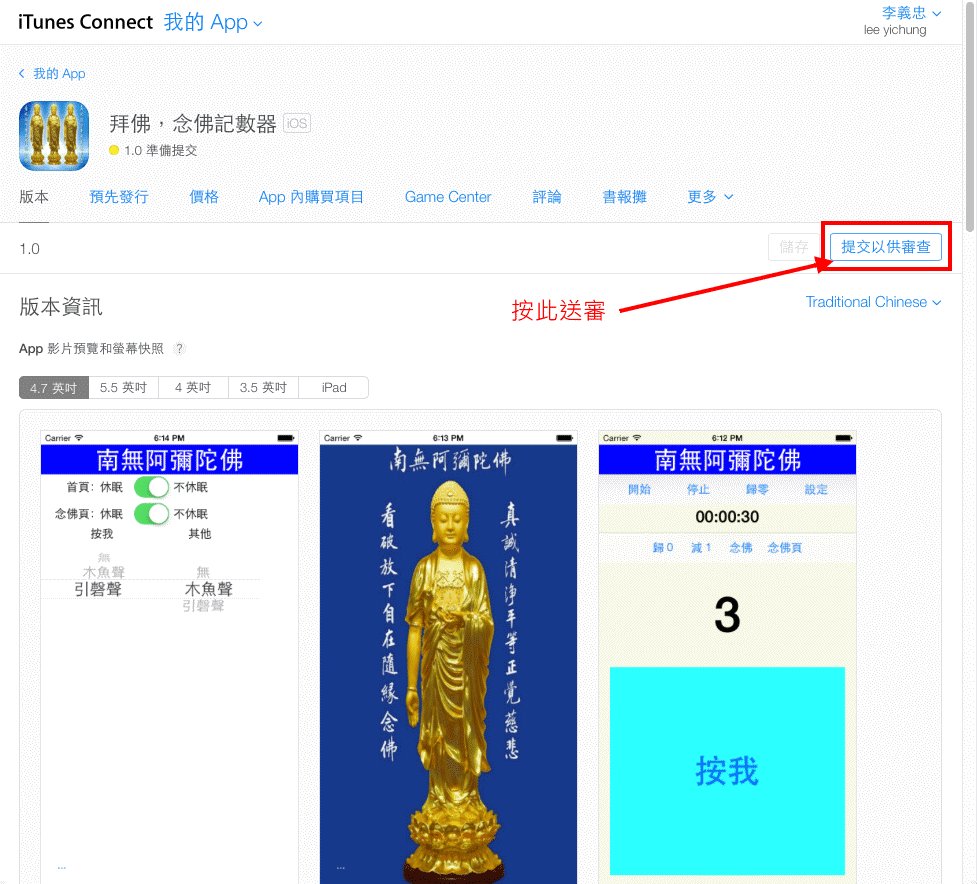 步驟十一:提交審查選項 現在已經有中文了 真方便

提交審查完成 狀態:正在等待審核

就這樣 等待審核完成 通知,若核准 在 App Store 就可以找到 APP安裝了 ^_^*
上架步驟1:到 Apple Developer 註冊一個新的APP ID
步驟2: Certificates 的 Production 要增加一個簽證
步驟四: XCODE APP ICON 要先設定好
步驟五:APP設定 Profile
步驟六:在 iTunes Connect 我的App 增加APP

下圖是錯誤的觀念
步驟七:增加完成 開始填入 APP 相關資訊
步驟八:上傳APP程式
價格及日期 設定好 就可以 提交 送審了
提交審查完成 狀態:正在等待審核
就這樣 等待審核完成 通知,若核准 在 App Store 就可以找到 APP安裝了 ^_^*
訂閱:
文章 (Atom)